College Algebra Workbook
Please provide credit to me when sharing all or parts of this workbook with other educators, even if you have modified it to suit your course needs. This work is protected under Creative Commons Attribution-NonCommercial-ShareAlike 4.0 International License. To view a copy of this license, visit http://creativecommons.org/licenses/by-nc-sa/4.0/ or send a letter to Creative Commons, PO Box 1866, Mountain View, CA 94042, USA.
Instructor Guide
Over Summer 2024, I was fortunate enough to be able to film myself teaching every single section out of the workbook, using group work as intended. These videos are posted on the password protected page linked below. These are intended for instructors to view only, hence the password. Contact me directly (my information is at the bottom of this page) to request the password if you are a teacher. If you are teaching Math 18A at SJSU specifically, then the coordinator should have provided the password. Reach out to them if you misplaced it.
Below is a written out how-to guide for using this workbook, if you prefer reading over watching. It covers topics such as how to distribute this to your students, the intended flow of the lessons, and how to implement group work following the workbook.
I have also included a sample of how I teach Section 1.2 to give you a concrete example of how I intended the workbook to be used.
Use the buttons here to jump to your desired section or just scroll down.
Getting Started
Before the term starts, you need to determine your answers to the following questions. Students do better when you have consistent classroom policies, especially when it comes to group work. Avoid changing your policies during the term.
-
For an in-person class, the intention is that students will obtain the workbook as a minimum cost reader. Check with with your school’s bookstore or printing services for how to set that up (make sure they print double-sided).
For SJSU: The coordinator has the workbook set up for purchase at the SJSU Associated Students Print Shop on the second floor of the Student Union.
Make this required! The idea is that they should use the workbook as outlines for taking notes in class.
I no longer allow students with tablets to request a digital copy instead. The internet is far too distracting and they will focus better if they have a paper copy. Of course, if you are teaching online, then you really should just distribute the workbook digitally. Don't expect your students to be in the area to purchase the workbook or to be able to print it at home.
-
The intention is that each lesson will be a mixture of you lecturing (to provide definitions and general procedures) and the students attempting the examples in small groups (see “Workbook Structure” below). However, while this approach is strongly recommended, group work is not necessarily required. You might choose to have students attempt the examples individually or in pairs with the person next to them (see FAQ).
Though, keep in mind that it is very difficult to switch once you have established either regular group work or more traditional lectures as the standard class mode. I would not recommend trying to do a mixture. Pick one or the other, and stick with it! Here’s why:
During my first semester of teaching, I was taking a professional development workshop simultaneously and, since we were all doing more traditional lectures, we were asked to try a day of group work. To be completely honest, it was an absolute mess and I basically just lost an entire day of content because the inertia of being used to my lecturing meant the students could not adjust that suddenly.
On the flip side, when I first started developing this workbook, there were a few sections which I did not know how to make group work friendly. I usually did group work, but I had 2 or 3 traditional lecture days for those more difficult sections and most of my students were literally bored to sleep because they were used to regular group work.
Regardless of your choice, consistency is key!
-
I suggest you find a system which lets you randomly assign groups every class.
There are various ways to do that; for example, have the students count off and group them accordingly. I use a deck of standard playing cards to assign groups (see the sample lesson for more details) because shuffling helps randomize assignments and it consistently guarantees there are no more than 4 students in each group.
There are many other approaches to forming groups, but let me discuss two in particular that I do not encourage…
The easiest option by far is to let students pick their own groups, but I strongly recommend against that!
(1) Students tend to not recognize that their friends are not necessarily the best study partners.
(2) Large friend groups tend to be very disruptive and distracting.
(3) There will be students who are always isolated and left out.
(4) Students who hate group work will partner up and ignore each other to work alone.
Hence, assigned groups are better. There are many ways to do that, and it might seem easier to just assign groups once at the beginning of the term, but again, I strongly recommend against it. Here are some problems you could run into with fixed groups:
(1) Attendance can be iffy and you might have students who are regularly stuck by themselves because their group didn’t show up. It can be uncomfortable for the student when you have to randomly attach them to another group.
(2) You might have inadvertently paired up people who simply do not work well together. It can potentially become hostile and you will need to reassign them to separate them, but it’s really better to just avoid this entirely.
(3) You might have inadvertently paired up friends who just goof off and distract or annoy their group mates. You’ll need to separate them, but they can be uncooperative with this.
Thus this is why I prefer randomly assigned groups that change every class. It’s not always perfect, but at the very least, if there are any less desirable pairings, it will only be for one class session (and if it is really necessary, you can easily and subtly rig it so that certain people are never paired together).
-
The main decision you need to make regarding homework is whether or not you will expect your students to write directly on the exercise pages and submit them.
For SJSU: If you want to do paper homework, talk to the coordinator about making the Exercise Book available to purchase at the Print Shop along with the main workbook for class notes.
If you intend to assign the exercises as physical homework, then you should request that the reader be sold loose-leaf (with 3-hole punches for students to keep in a binder) instead of pre-bound. That way they can write directly on the exercise pages and then remove them for submission. The Exercise Book is formatted so that exercise pages can be safely removed without losing any parts of any other assignment.
However, many SJSU folks prefer the online option of using Edfinity. Just be aware that they are just similar problems; they were not specifically written to accompany the workbook. If you use Edfinity, you should also post the Exercise Book and the keys on Canvas as optional extra practice for students who want it (it is basically a giant practice final).
Anyone not affiliated with SJSU will need to reach out to Edfinity on their own to see if you can also use the course we have set up. Otherwise, you will need to set up online homework assignments yourself or just use the Exercise Book.
Workbook Structure
This workbook is broken into four chapters:
Chapter 1 - Solving Algebraically
Chapter 2 - Graphs and Functions
Chapter 3 - Polynomials
Chapter 4 - Exponentials and Logarithms
Each chapter is broken into sections that were designed to be taught one section per day in 75 minute classes, but you should be able to adapt the workbook to any schedule. Each section consists of a lesson outline to be used in class and exercises to be assigned as homework or additional practice.
IMPORTANT NOTE:
You are NOT meant to actually lecture on the material in Section 1.1! It is supposed to be review from Intermediate Algebra, i.e., it is prerequisite material for this class. The idea is you can spend half of your first day going over your syllabus without feeling rushed to start new material. When you finish the syllabus overview, they can start getting used to working in groups by trying the practice problems in Section 1.1 together for the remainder of the class time. If they don’t finish all the review problems, then they can work on it at home. Please watch the video for Section 1.1 on the page linked above if you are confused.
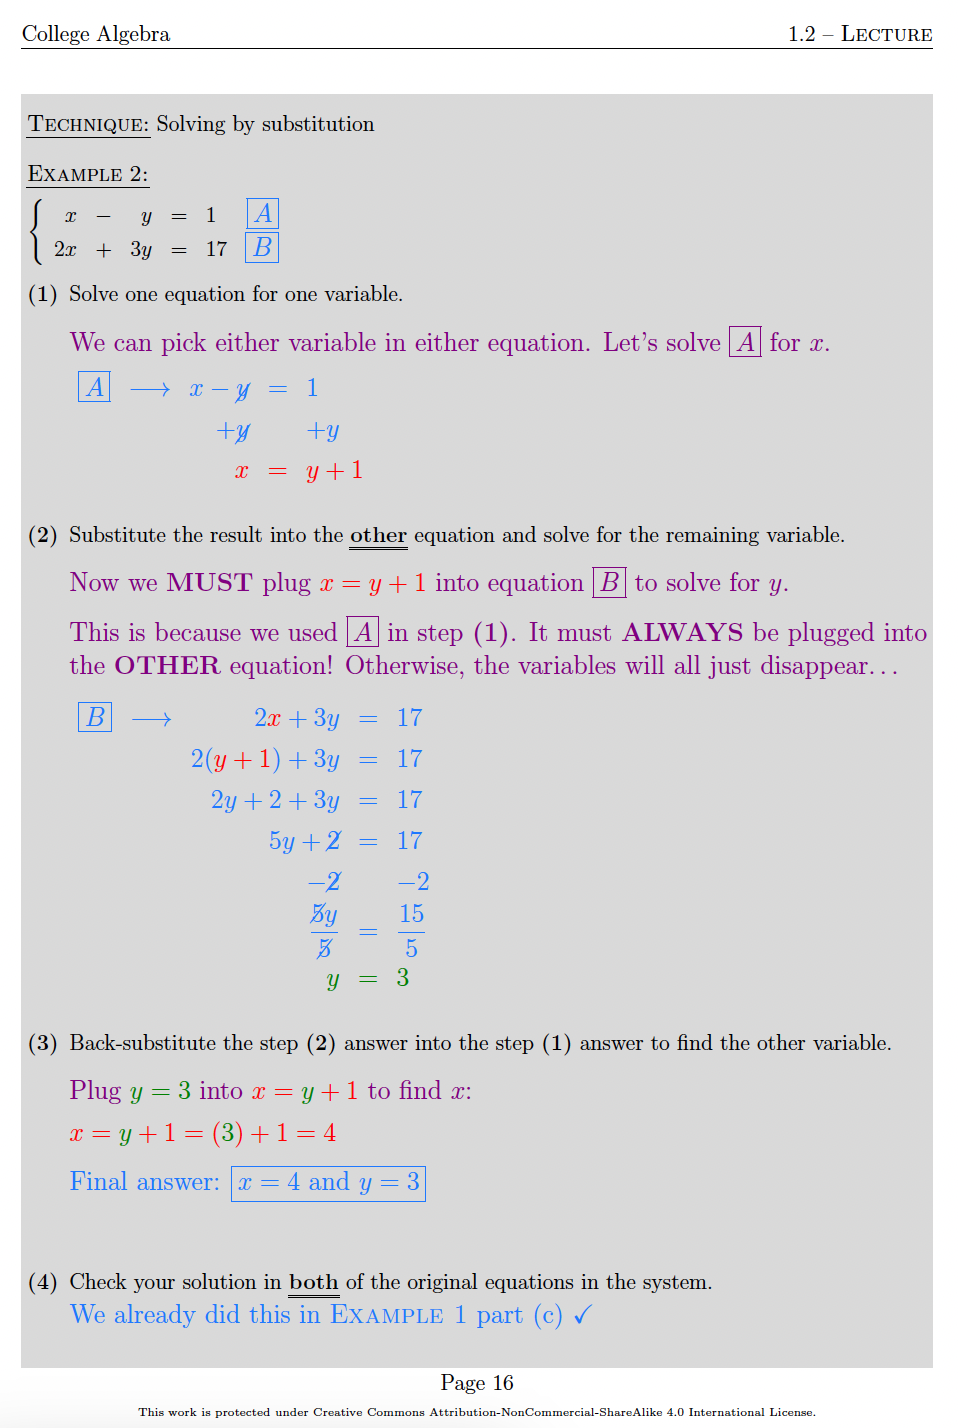
For all other lessons, you will see several gray boxes throughout the outline. These designate areas where students will take notes while the instructor gives a mini-lecture on the relevant material. I’ve included an image of the first page of Section 1.2 as an example. There you will see a gray box with two key vocabulary words. The instructor would provide the definitions in a mini-lecture format while every student takes notes in their own copy of the workbook. The students are not expected to already know this information coming into class (though some might be familiar with some of it from prior courses).
When an example problem is not in a gray box, the students should be given the opportunity to attempt it before the instructor reviews the solution. On the first page of Section 1.2, we see three part example. Some larger problems have a scaffold to guide the students through smaller steps. I like to ask certain groups to stand up and write their work on the board for the whole class to see it. Once the students have had adequate time to attempt the examples, the instructor should review the solutions before moving onto the next gray box mini-lecture.

The intention is for students to attempt the example problems in small groups during class, but there are alternative approaches (see FAQ). If you utilize group work, it is important that every student takes their own notes in the gray boxes and that every student writes down the solution for each example, even if they are lost and end up just copying their group mates. The idea is that filling out the workbook is the notes for each day of class. So if only one person in each group takes notes and writes all the solutions, then only that person has notes for the day.
In the Exercise Book, there are 4 to 5 exercises which are intended to be assigned as homework. The book is formatted so that they should have enough room to write out their work for each problem. If you use alternative or online homework assignments, then these exercises can just be used as additional practice for your students. Appendix A contains hints for these exercises, should any student need them. Appendix B provides even more exercises that are similar to the ones at the end of each section, if your students need additional practice. Answers are provided for the Appendix B exercises, but no work is provided for those solutions. This is especially useful to help students prepare for exams.
The main Workbook itself contains an Appendix with more details and alternate methods to approaching certain problems. If you are teaching College Algebra at SJSU, then these are optional and do not need to be covered in class. However, you might find them helpful to answer questions from especially inquisitive students. In particular, I suggest that you go to that Appendix yourself if you are unfamiliar with the factoring technique taught in Section 1.4 (unfortunately many people are told that they should just magically “see” the factors and were never actually taught how to factor algorithmically…)
Sample Lesson
You need to actually read through the key before each and every lesson! You might feel like you know College Algebra very well, but it is easy to stumble if you haven’t read the key ahead of your class. This can cause a lot of confusion for your students, especially if they are taking notes directly in the workbook! You need to make sure you are familiar with the pages they will be filling out so that you can guide them through it as smoothly as possible.
If you are particularly unsure how to explain something or what pacing to follow, go watch the videos linked again here:
AGAIN IMPORTANT NOTE:
You are NOT meant to actually lecture on the material in Section 1.1! It is supposed to be review from Intermediate Algebra, i.e., it is prerequisite material for this class. The idea is you can spend half of your first day going over your syllabus without feeling rushed to start new material. When you finish the syllabus overview, they can start getting used to working in groups by trying the practice problems in Section 1.1 together for the remainder of the class time. If they don’t finish all the review problems, then they can work on it at home. Please watch the video for Section 1.1 on the page linked above if you are confused.
This sample lesson will be for Section 1.2, which is where you will actually start teaching like normal.
BEFORE CLASS STARTS:
I arrive early to rearrange the desks into groups of 4. You can ask students to help, but some guidance will be necessary. Specifically, you want to make sure there is sufficient space for you to walk around.
I prefer to arrange the desks in the pinwheel patterns you see pictured. If you have desks with an arm rest like these, be mindful to arrange them in a way that is easy to get in and out of. I try to to put them at an angle so that no one is facing entirely opposite the board, but I also just tell the students with a poor view to physically shift their desks when I am lecturing and then shift back for group work.
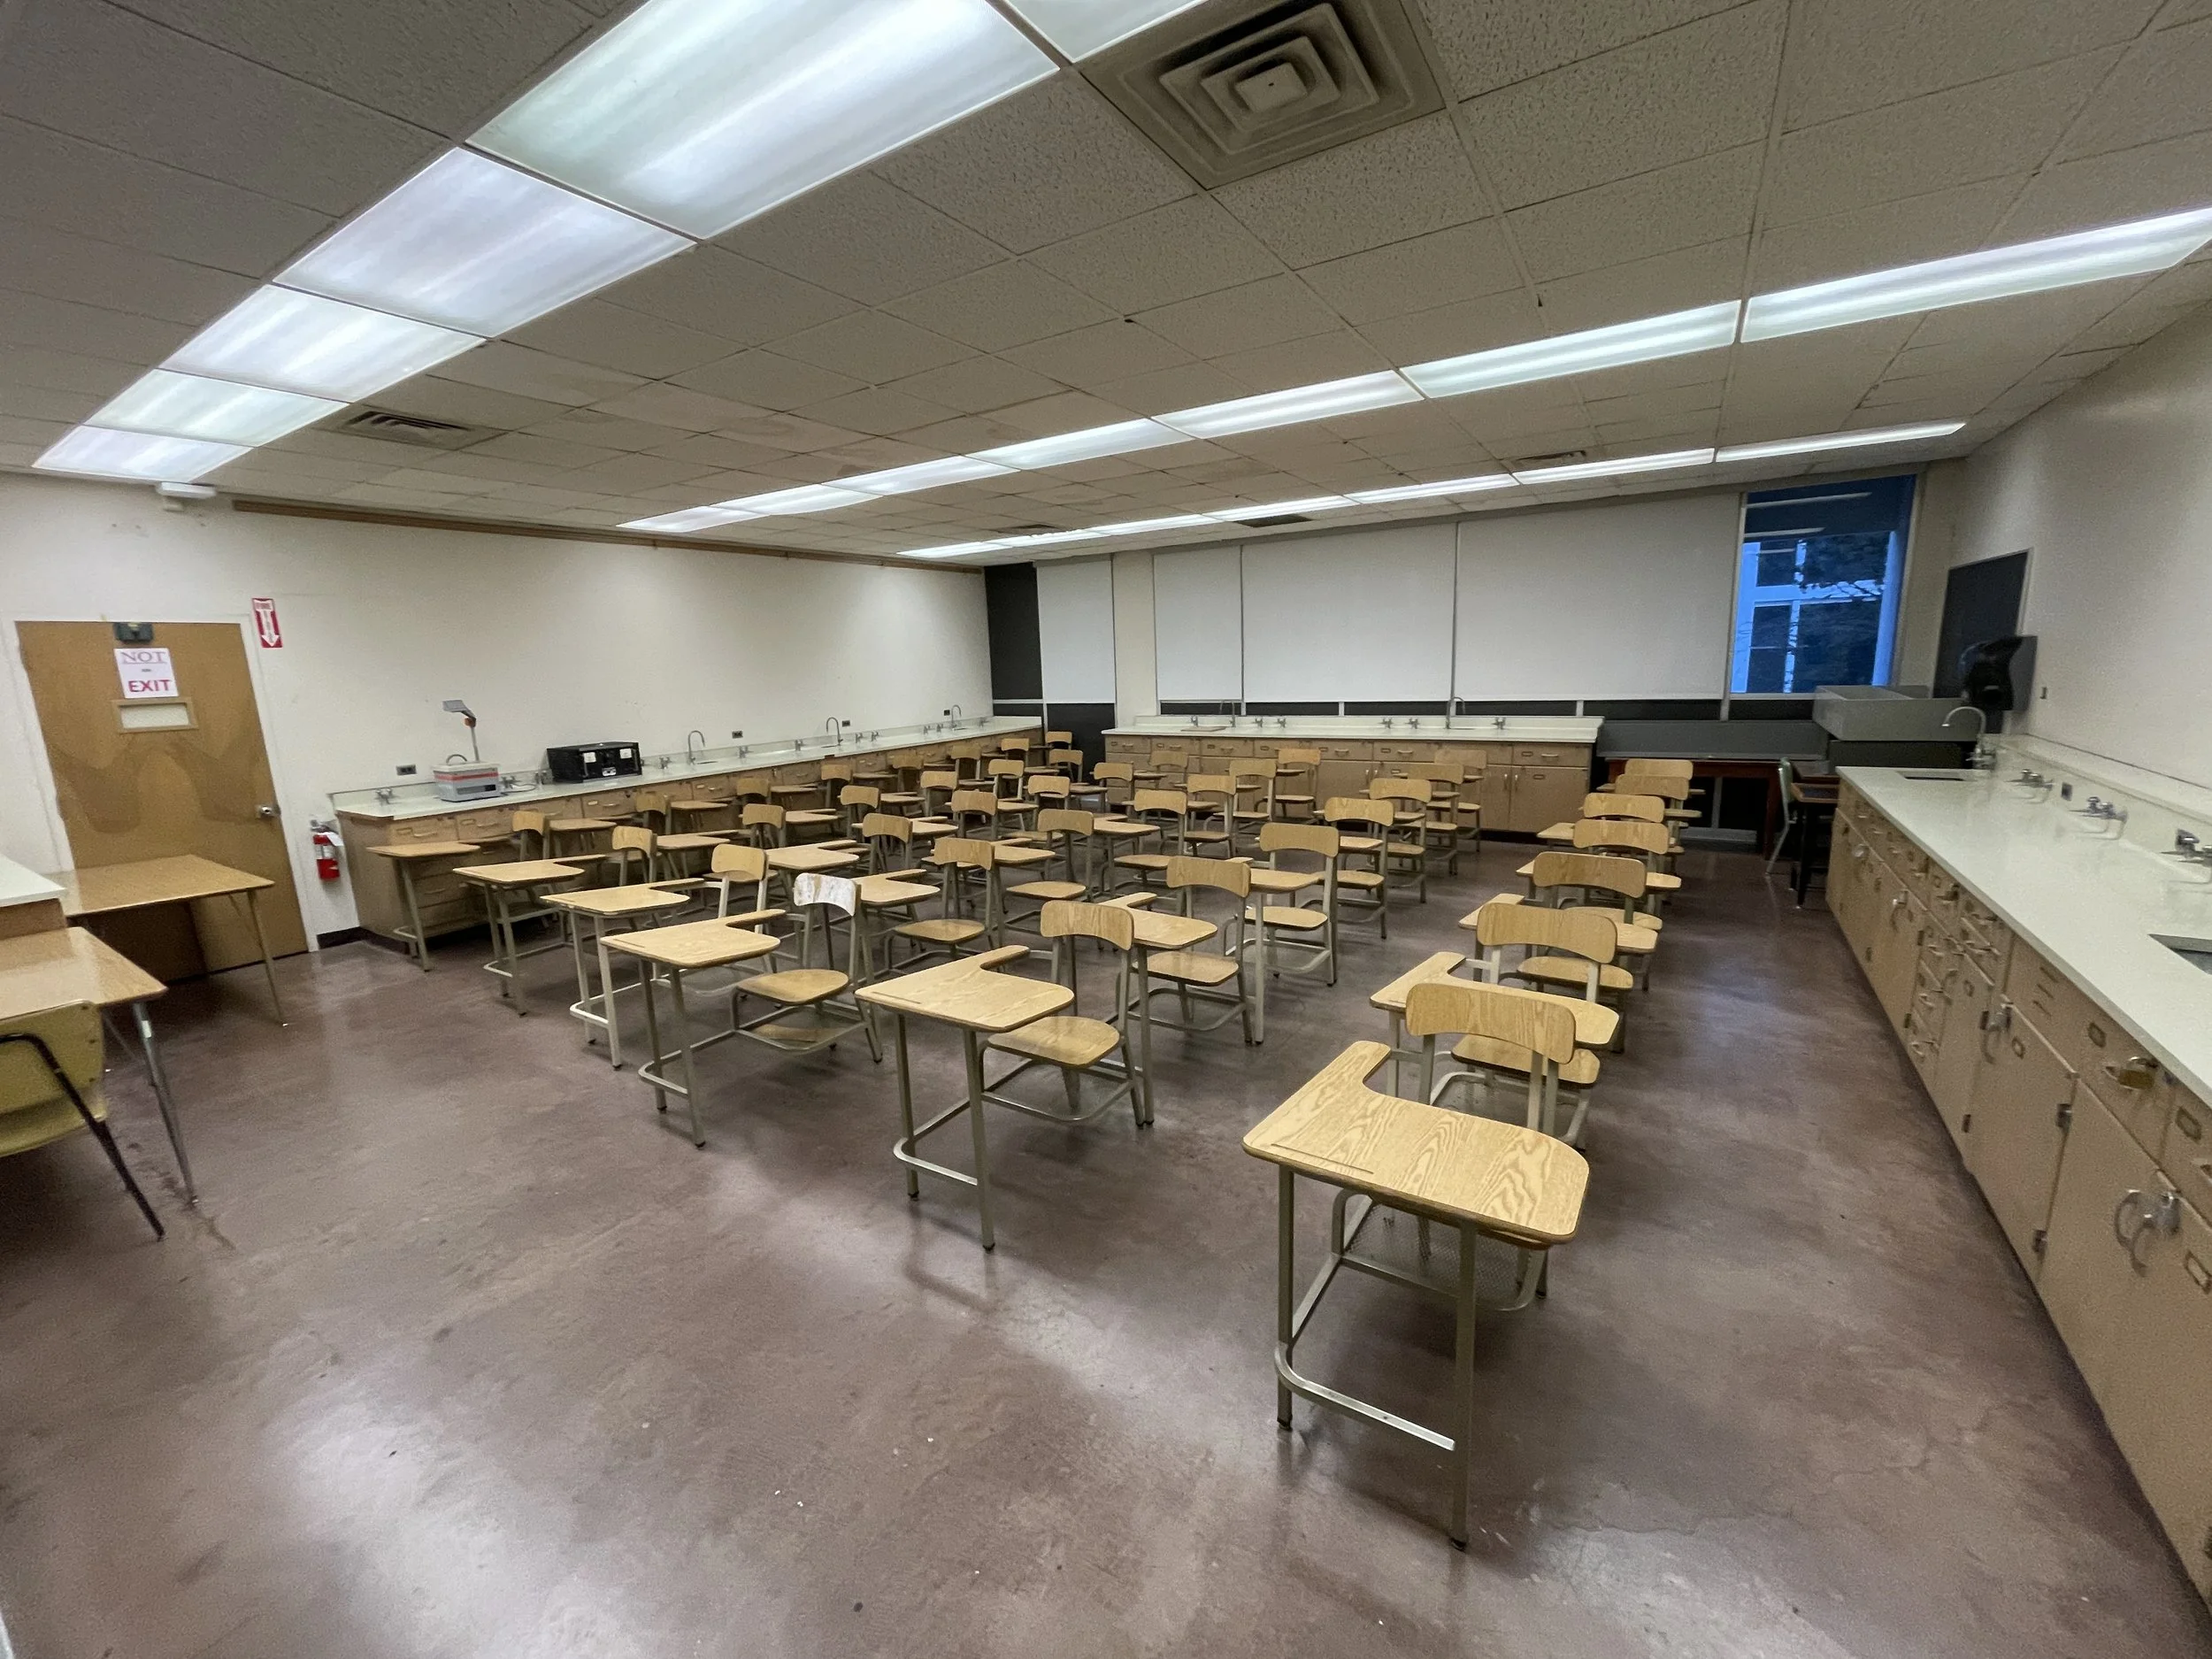
Desks arranged for a traditional lecture.
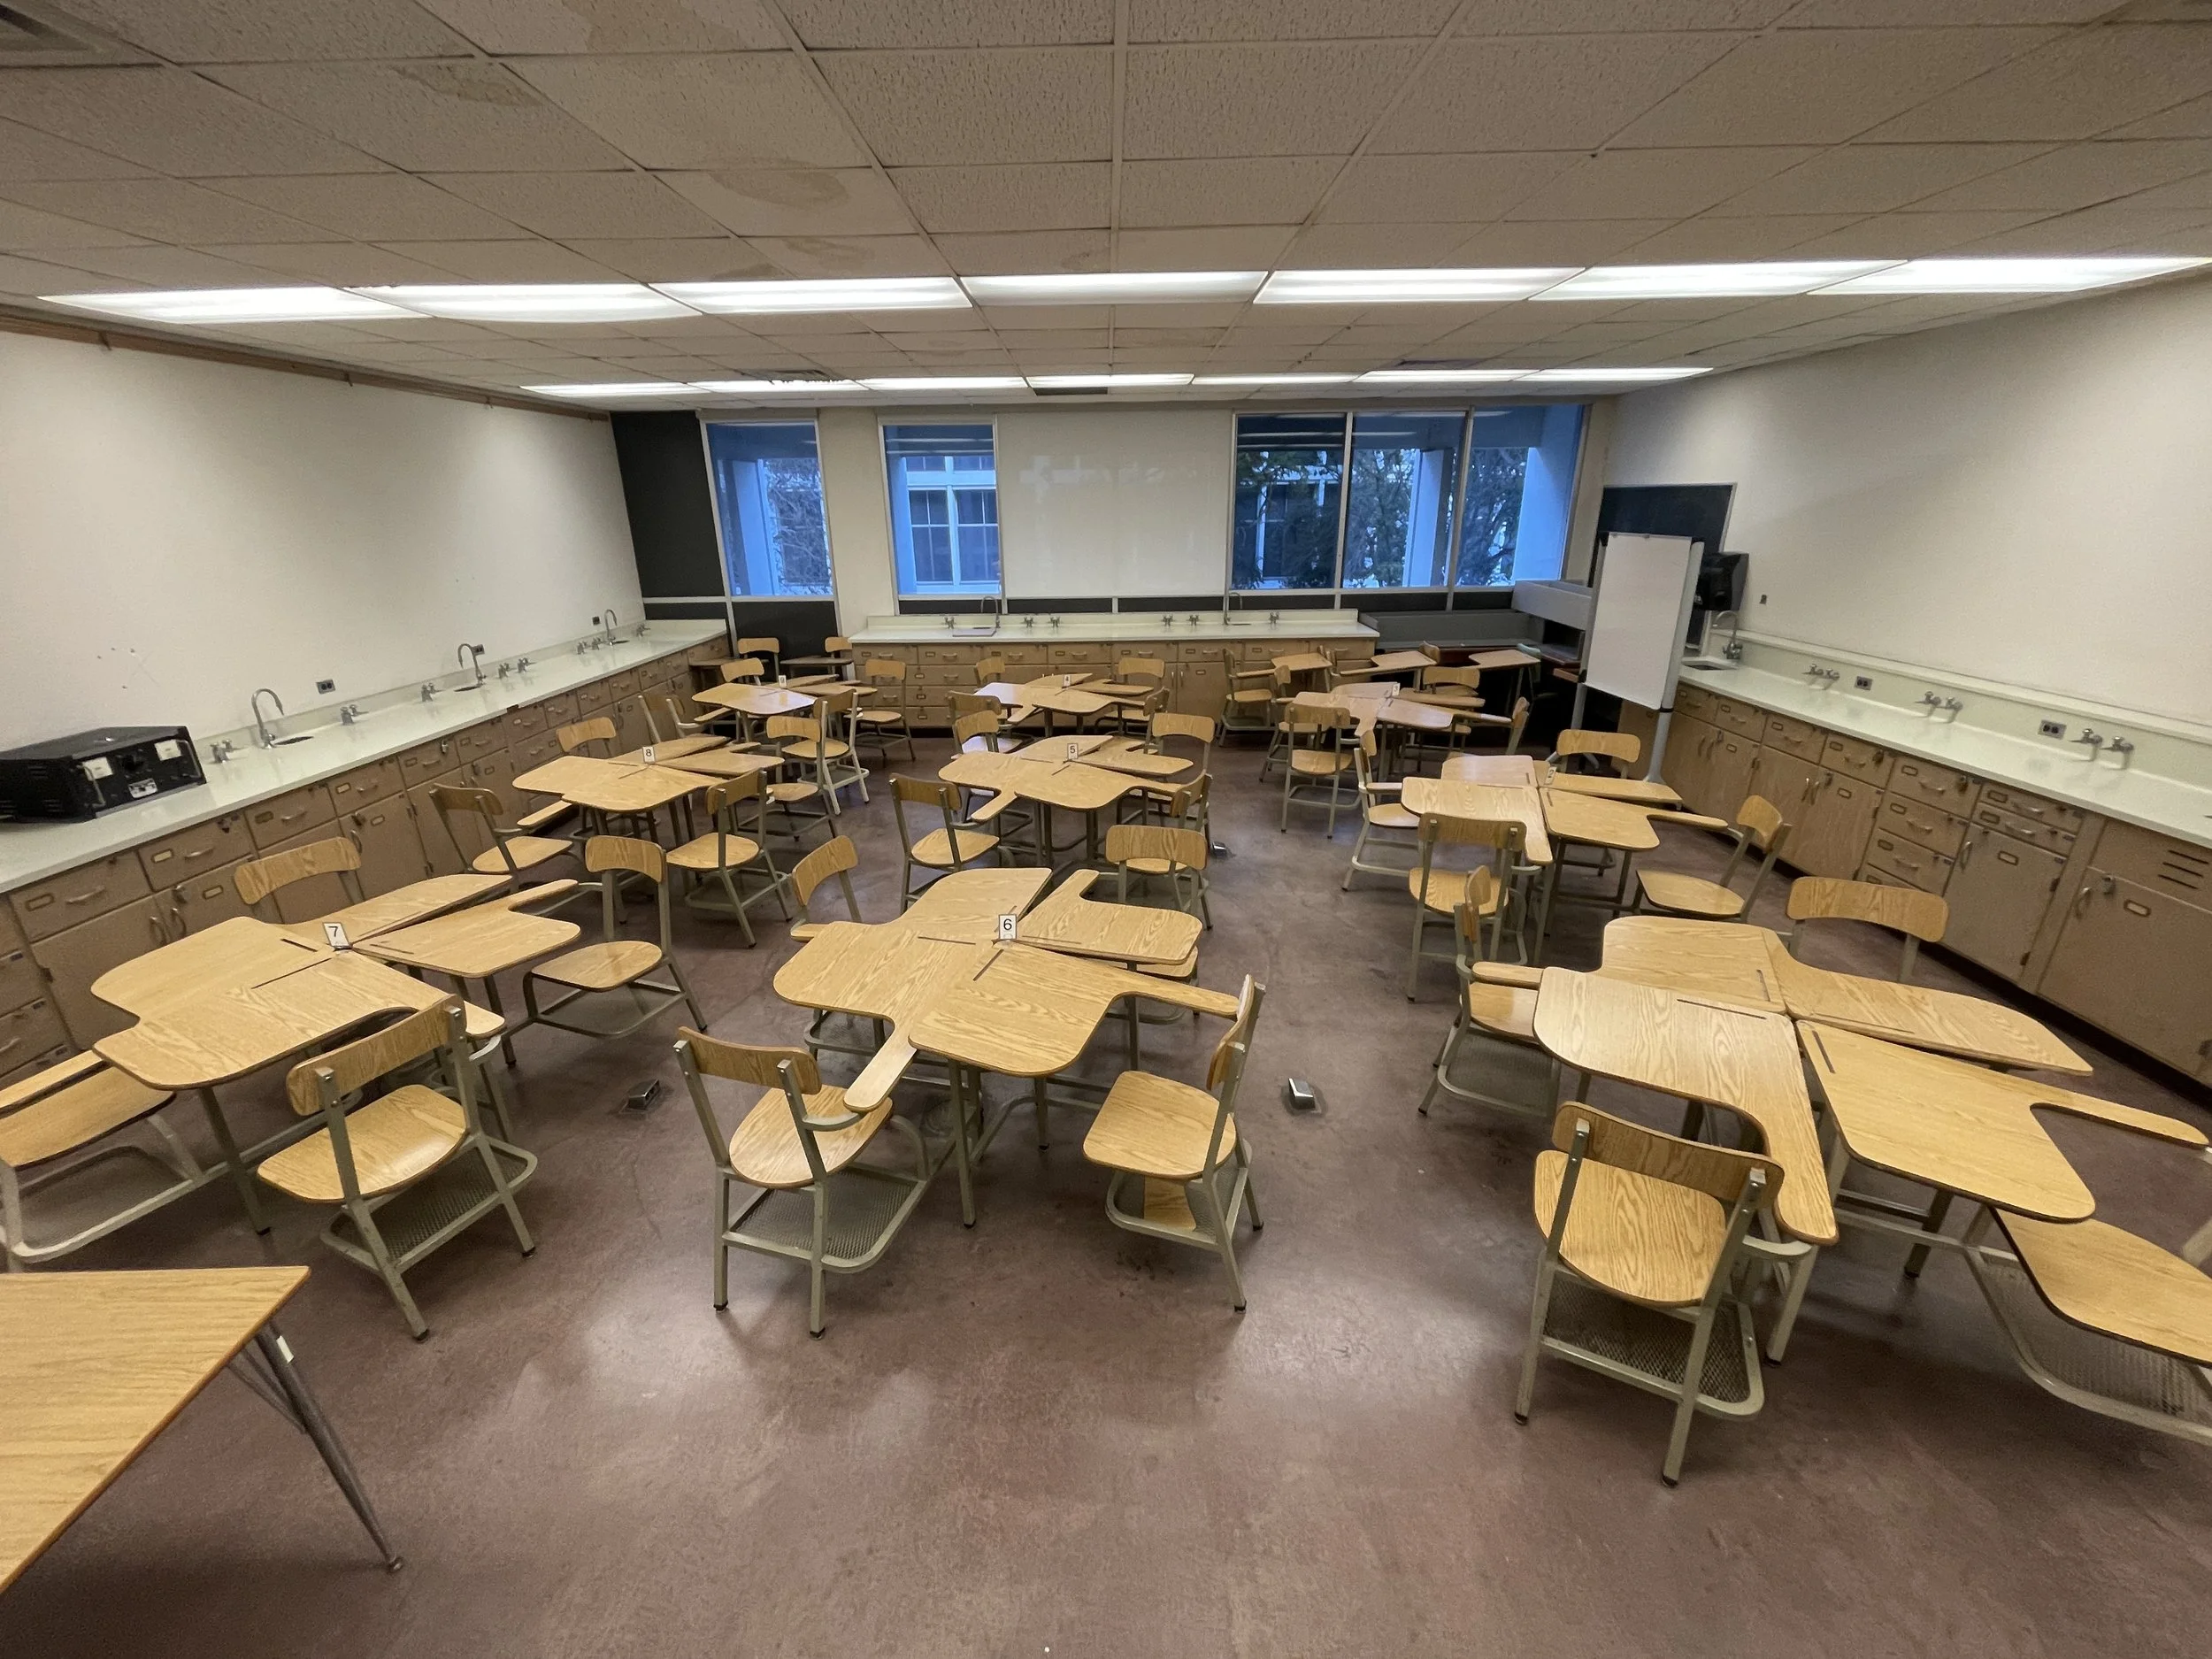
Desks in the same room rearranged for group work.
ASSIGNING GROUPS:
As students enter the classroom, I have them follow the pictured guidance for getting their group assignment.
(1) Students first sanitize their hands (this was done when we were still recovering from the pandemic, but, hey, it’s not a bad habit to continue).
(2) Students draw a card (the deck is limited, see below).
(3) Once students take note of the cards face value, they immediately return the card (they tend to lose them if they take them to their desks).
(4) They go find the group table matching their card’s face value. If you zoom in on the previous images, you can see that I put signs on the group tables to indicate where each face value should go.
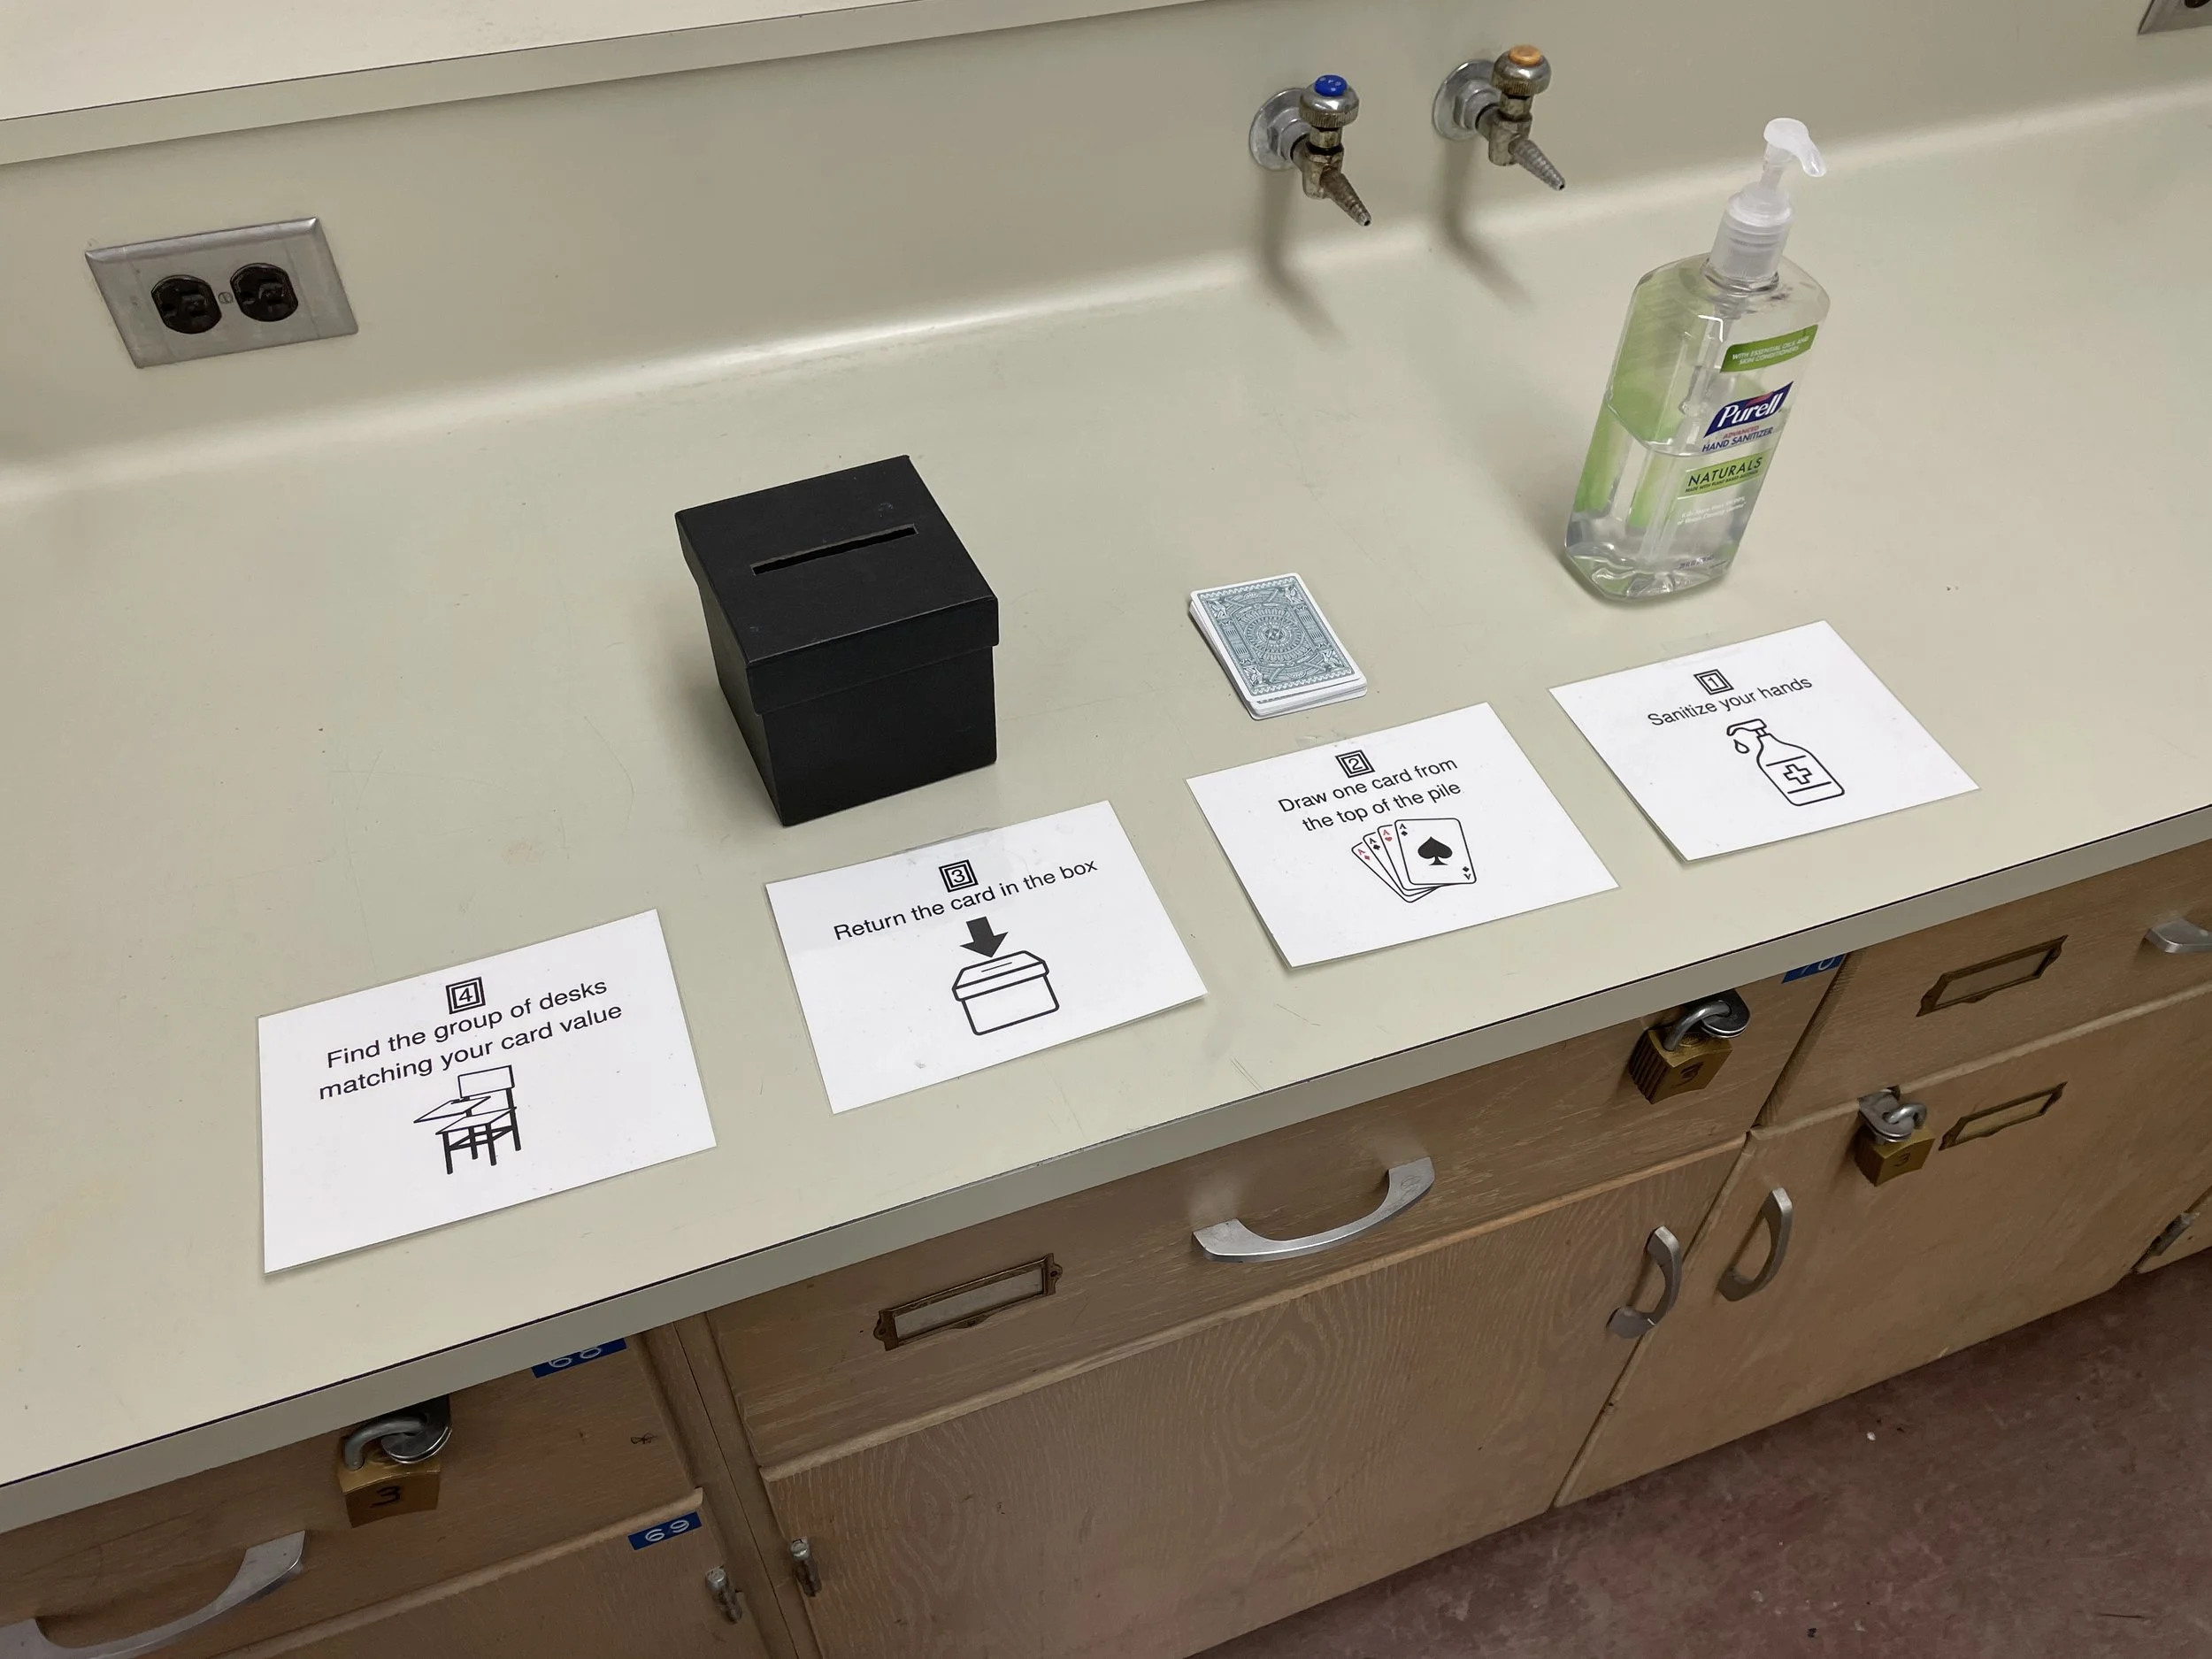
I do not put out the entire standard playing deck. For example, I had about 34 students in each class. This means I can make seven groups of 4 students and two groups of 3 students, assuming everyone shows up. That is a total of nine groups, so I only put out face values of Ace, 2, 3, 4, 5, 6, 7, 8, and King (I swapped out the 9’s for Kings because students often only paid half attention to their card and mixed up 6’s and 9’s…).
I also did not put out all four suits at once. I typically started with just two suits (say spades and diamonds) of the above face values. Once those ran out, I’d put out another suit (say hearts). Then if those also ran out, I would put out the final suit (clubs, in this example). I do this because I rarely had perfect attendance on non-exam days. Basically, I’m rigging the deck to evenly spread out the students, even when a non-zero number of students skip class.
And just to reiterate, I set all of this up for them to do as they enter the classroom. You waste time and cause confusion by having everyone move desks after they’ve arrived. I strongly recommend that you find a system that has all the groups completely set up and ready to go before class starts.
PAGE 15 - The start of the lesson for Section 1.2:
I begin by greeting the class. I tell them any announcements about upcoming assignments or exams. For the first three to four lessons, I will remind them of the basic structure of the workbook. Something like, “Just as reminder, since we are still getting used to the workbook, for the gray boxes, I will lecture at the board and you will take normal notes. Then I will ask you to attempt the following example or examples with your group and everyone should be writing the solutions in their own workbook. We will switch back and forth between grey boxes and group work as we go through the lesson.” Then, I tell them which section we are working on with the corresponding page in the workbook. In this example we are going through Section 1.2 starting on page 15.
I give a mini-lecture to define the terms listed in the gray box (“system of equations” and “linear”). I do this verbally while I simultaneously write them on the board. Although they are sitting in their assigned groups, every student should be quietly following along and writing their own notes.
After going over each definition, I ask the students to work on Example 1 with their group mates. While they are discussing it amongst themselves, I am copying the example onto the board, leaving space for the blanks to be filled in.
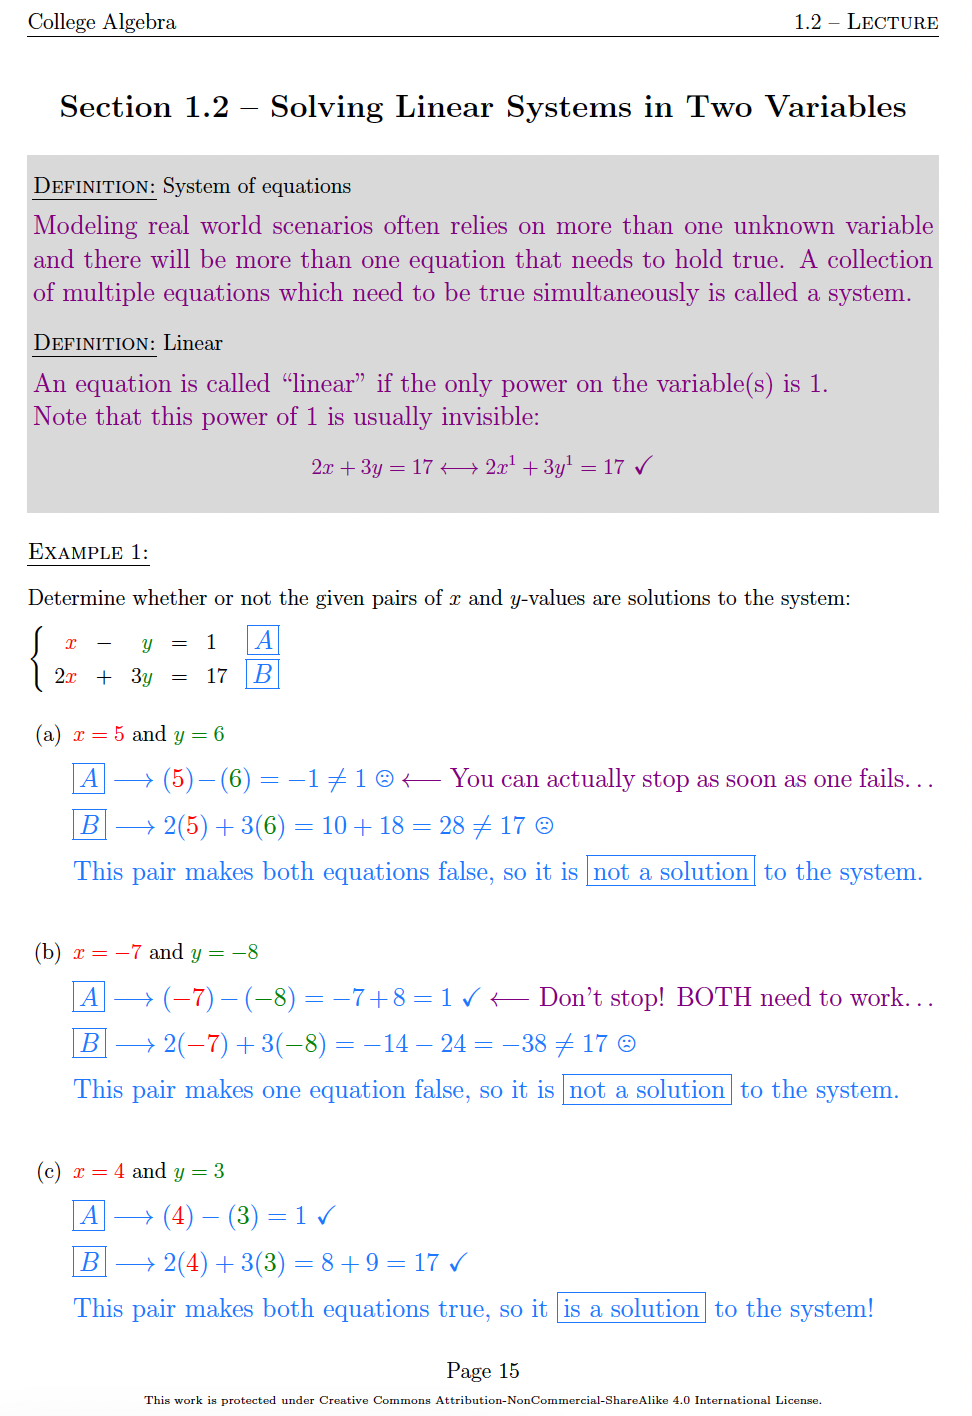
They should finish this example fairly quickly and are probably ready to move on by the time I finish copying it onto the board. I would request the Ace group to write their work for part (a) on the board; the 2 group to write their work for part (b) on the board; and the 3 group to write their work for part (c) on the board. I encourage them to all come up together to make them feel less put on the spot. I also let them pick their own volunteer member(s) to write on the board, but if they are being too slow and hesitant, I will hand someone specific a marker.
After every part has work written on the board, I will briefly review each answer out loud with the class and correct where necessary. Be encouraging! Tell them that it’s ok that they didn’t quite get the right answer and try to give them a chance to correct themselves before giving them the answer.
PAGE 16:
Now we transition into another mini-lecture. This time I will give them the general idea of the substitution technique by walking them through the entirety of Example 2.
More complicated examples like this are sometimes included in gray boxes so that you have a chance to demonstrate one before they try it. When you feel it is necessary, you can also make up small examples to add to gray boxes.
I try to engage the students in these mini-lectures, when appropriate, through call-and-response. In this example, I try to ask very leading questions to get them to see why solving equation A for x is the best choice here. They often catch on, but sometimes I have to be a little more direct. Just be flexible! Every group of students is different.
On page 17, they have the very similar Example 3 to try out substitution in groups.
While everyone is working, I will now ask the 4 group to come up to the board and write their work. I just keep rotating through the groups for each example.
From here, it’s just rinse and repeat. Mini-lecture for the gray boxes; let them try non-gray box examples in groups; have some group write their work on the board for that example; verbally review their work with the entire class; repeat.
I let the groups pick their own representative and they can send multiple people up if everyone is feeling shy. College Algebra students tend to lack confidence, so I try to not put too much pressure on any one student. In particular, I do not make them verbally present their work in front of the class. They may return to their seats and, after it seems like everyone else has also finished the problem, I will bring the class back together to discuss the solution.
Make sure you keep the class moving at a reasonable pace. Try to not rush them, but make sure you get through the entire lesson so you don’t fall behind schedule. Not every group needs to complete the example before you start reviewing it, but try to let the majority finish. If the group you called up the board is lost, ask a different group instead and come back to them to show a different example. If the whole class seems lost, then just stop them and demonstrate the example to the whole class yourself.
I have found it to be very helpful to insist when they work on examples that they need to talk before they start writing. I say this to them out loud and often. Even if it’s just confirming, “yes we would all start the problem this way,” it will help the more shy students get the assistance they need instead of staring silently at their workbook while their more proficient group mates rush through the problem and ignore each other.
While they work on examples, move around the room and encourage people who look lost to speak up and ask for help. Encourage the proficient students to slow down and check in on their group mates and offer help.
ADDITIONAL REMARKS:
I cannot emphasize this enough: You are NOT meant to actually lecture on the material in Section 1.1! It is supposed to be review from Intermediate Algebra, i.e., it is prerequisite material for this class. The idea is you can spend half of your first day going over your syllabus without feeling rushed to start new material. When you finish the syllabus overview, they can start getting used to working in groups by trying the practice problems in Section 1.1 together for the remainder of the class time. If they don’t finish all the review problems, then they can work on it at home. Please watch the video for Section 1.1 on the page linked above if you are confused.
Do not just stand at the front of the classroom idly while students attempt the examples. Walk around, look at their papers, and eavesdrop to figure out how they are doing. This also makes it more comfortable for students to ask questions as you walk by instead of needing to call you over.
Students can be hesitant to ask questions due to embarrassment, which is why it is important to walk around. In particular, you want to watch out for individual students who are not participating in their groups because they are lost and embarrassed. Gently encourage the other students to explain what they are doing and to make sure everyone is on the same page before they move on.
If a group asks a question, try to avoid just directly giving them the answer. Instead ask leading questions and encourage them to ask each other instead of you. You can also tell them they are allowed to consult other groups nearby if everyone is stumped.
All of these still apply if you opt for a more traditional style where students attempt the examples individually or in pairs instead of groups.
Frequently Asked Questions
-
I do understand that there are instructors who are hesitant to switch to including things like group work in their classrooms. I was one of those teachers myself due to many poor group work experiences as a student. That being said, more and more research is very clearly indicating that students perform better academically when they experience active learning teaching methods. This is why college level math departments are now encouraging a shift to focusing on active learning: the research supports it. (Those links are just a starting point for this topic, you will easily find many more resources through a cursory Google search.)
So I strongly recommend* that you give it a try! My hope is that this workbook makes it easier than you expect. But, again, I do understand that this takes a lot of effort to implement and may be daunting for new instructors and for anyone who never had a good example of what effective group work looks like. The primary goal of creating this workbook, especially for TAs at SJSU, was to make a tool that helps ease instructors into using more active learning. It works best when used with groups as outlined above, but there are alternative approaches. Basically, as long as you don’t just read the key out to them as they frantically try to write it all down, you will be doing some level of active learning.
The easiest way to make this feel a little closer to traditional lecturing is to just swap the part where they attempt the examples in groups with just pausing for everyone to try the examples on their own before you go through the solutions on the board yourself. I would at least try to encourage them to talk to the person next to them if they get stuck, that way they still get practice vocalizing mathematics but you don’t need to move desks or anything.
*IMPORTANT CAVEAT: If you are using this workbook to teach a class online with synchronous lectures, then the paragraph above is exactly how I would approach the course. Group work is usually not effective in online settings. See the next question for more details.
-
Yes, but as I mentioned in the previous question, I do NOT recommend the group work approach for online classes.
Unless you get very lucky with your students, most online classes will not be successful with trying to force group work. If you use Zoom, for example, I guarantee you the majority of your students will sit in break-out rooms muted, with cameras off, begrudgingly waiting for the rooms to be closed and class to continue. The few students that do try to talk to their peers will just be discouraged and disheartened by being ignored in the break-out rooms. This is just the unfortunate reality of online lectures, so I strongly recommend that you do not attempt group work online.
Instead, use the workbook as a lesson plan for a more traditional lecture. You can still provide the blank PDF outlines online and suggest that students use them to follow along. Then, if you have a tablet, you can screen share and write directly on the blank PDFs for your lecture. Alternatively, you may want to create slides based on the workbook (see below, I don’t have any premade slides for you). When you get to the examples, simply pause and tell the students to take a few minutes to try them on their own before you go through the solution. At that point, you can ask for volunteers to walk the class through the solution while you transcribe it to encourage some engagement (but try to avoid getting hung up and upset if no one wants to unmute; it is a very uncomfortable spotlight for many students).
-
Absolutely not! The keys are merely guidelines for the content, not scripts you recite verbatim. The keys are written in a conversational tone simply to make them more accessible to students, should you decide to make them available. But just like any traditional textbook, you are expected to put your own flair on the presentation and wording in your classroom.
In particular, if you are teaching College Algebra at SJSU, then this workbook was written to cover exactly what is needed for your students to perform well on the common final. Thus, the idea is you do not need to spend a significant amount of your time on content management. You can trust that this workbook covers all the necessary content and instead just focus on how you present the material. -
You are free to provide your students with whatever parts of the workbook, blank or with the key, that you feel like!
I actually encourage you to provide the keys (when you feel it is appropriate) because seeing the full solutions can help students study and learn. This makes it similar to using a big publisher textbook where they can go back and re-read examples in the book. Some publishers even offer homework solution manuals for students to purchase, so it’s nice to make the solutions freely available to everyone! This can also help alleviate issues when students are absent, but, for whatever reason, are unable to get good notes from a classmate.
It is also worth remembering that it is pretty easy for students to find this website and download the solution keys themselves… Don't directly give them the link to this site, but you might as well post them on Canvas (or whatever LMS your school uses) so everyone has clear and easy access. That ensures no student is stuck with an unfair disadvantage simply because they did not think to poke around on the internet for the solution keys.
I suggest you schedule each lesson’s key to post after the corresponding lecture. Mainly, you do not want them to already have full solutions to the examples they are supposed to be trying on their own in class! Additionally, if you post them before each lecture, students may feel inclined to just skip class since they already have the notes… Hence, posting them after will likely encourage better attendance. Similarly, I suggest posting the homework keys after the assignments are due, unless you are just using the Exercise Book as optional extra practice and assigning other graded homework.
-
Not that I’ve made. I’m more partial to writing on whiteboards or using paper with a document camera, so I never had a need for slides.
But if you are so inclined, please feel free to make your own slides based on the workbook.
-
Make every section worth 10 points (use your best judgement in how to allocate those points across the problems in each section). Feel free to occasionally make the more challenging problems worth extra credit.
Try to give half credit just for trying. For example, if a problem is worth 2 points, give 0 only if it is totally blank; give 0.5 for a nonsense attempt; give 1 point for an honest attempt with a big mistake; give 1.5 if they were close but made some minor mistake; and give 2 points if it is fully correct.
Drop 3 to 5 sections of homework at the end of the course (use your best judgement on how many is appropriate) OR allow students to submit corrections for partial credit back (if you have the capacity to grade that). -
For those of you affiliated with SJSU, yes! I have gather similar problems into assignments via Edfinity. The coordinator should have provided you with everything you need for that.
Just keep in mind that these are just similar problems. I did not write these to perfectly match the workbook. Make sure you look at the assignments yourself to catch formatting quirks and any other weirdness (for example, Edfinity does not have an ability to type in union symbols for interval notation and they will get it wrong if they try a capital letter U).
For anyone not affiliated with SJSU, you will need to reach out to Edfinity on your own to see if they can connect you to our premade class. Otherwise, you will have to set up your own online homework. -
The short answer is because this workbook was originally created very specifically for teaching College Algebra at SJSU.
The long answer is because, at SJSU, this is a coordinated course. The main goal is to prepare students to pass the common final exam written by the coordinator (who was Dr. Tim Hsu at the time of writing). The workbook is tailored to meet that goal. In fact, the vast majority of the exercises were directly recycled from previous versions of the common final!(If you have qualms about “teaching to a test,” try to think of it instead as the common final is really an assessment of youand whether or not you taught the material expected by the coordinator. The common final is directly reflective of the student learning outcomes for the course. Ultimately, you are just teaching to those expectations; they just happen to be most clearly outlined in the final exam.)
Thus, if you are a TA or instructor at SJSU, don’t worry! Whatever detail you think is missing is not necessary to meet the coordinator’s expectations. However, if you would still like to include it, or you are adapting this workbook for use at another institution, look for it in the Appendix! Some examples include:
Section 1.2 focuses only on solving systems with substitution and elimination, but solving by graphing is in the Appendix.
Sections 1.4 and 1.5 entirely skip completing the square as a quadratic solving method, but it is covered in the Appendix.
Section 4.1 avoids inverting any functions which require domain restrictions, like x², but that function is specifically covered in the Appendix.I suggest you make it clear to your students that the Appendix exists and may be interesting to them. Many of them will not come into this class knowing how to use a textbook to it's full potential.
If the topic you want is not in the Appendix, then you will need to find your own resources to help you include it in your course. -
No.
Sorry, but I am a bit protective of my code. It took me two years of fiddling with it to nail down the formatting and figure out all the quirks of LaTeX to make this work. To be quite frank, I think providing the PDFs of everything is already a tremendous amount of free resources. Thus, I think it is fair that I am not willing to also freely distribute my .tex files.
Besides, if you were working with a traditional textbook from a big publisher (Pearson, Cengage, etc.) and you disliked the wording of a particular section, you wouldn’t reach out to the author and ask for a copy of their manuscript so that you can change it, would you? No, of course not. You would just present the material in class according to your preference, and maybe remark to your students that they will see a different approach in the book. Use the same idea here.
If you are wanting to provide the solution keys, but are worried they will confuse your students because you chose to present the material very differently, then I suggest you print a copy of the blank section outline, write in your own key, then scan and upload that for your students. (Trust me, in most cases, this is probably less effort than trying to parse out my code to change a few steps on a problem or two anyways...)
If you are asking because you like the style of my formatting and wish to emulate it for your own projects, then I am flattered, but I encourage you to just Google it. There are many helpful forum posts out there to help you make LaTeX work for you. That’s how I figured it out. It might sound cliché, but you will honestly get a much better grasp on LaTeX by poking around and piecing it together yourself than by just copying my stuff directly (what did you expect me to say? I’m a teacher too 🙂).
Acknowledgements
I couldn’t have made this without the encouragement and support from the people around me. This list is partially included in the workbook itself, but I want to add to it and reiterate how incredibly thankful I am to the following folks:
My mom for being my first student.
My dad for teaching me that I really can do it myself.
John Baldwin for believing in me since community college. He stuck by my side through some of my most difficult college experiences. I will be forever grateful for his unwavering support and confidence in me.
Emily Henderson for being one of the coolest graduate classmates I was lucky enough to meet at SJSU. I seriously doubt I would have made it through teaching and being a student myself and taking on this writing project without my awesome sauce study buddy.
Evan Tauzer for volunteering to pilot this workbook in his classrooms, but also for not holding back his sass when I asked for critique.
Trent Osland for volunteering to pilot this workbook in his classrooms too, but also for his kind feedback and delightful devotion to Da Bears.
Kenneth Jones for being my person, my embodiment of warmth and safety, and for sheltering me from my self doubts throughout this project.
My baby girl Laika for being the absolute best pupper there is.
And last, but not least, Dr. Tim Hsu, my advisor on this Master’s writing project. This workbook wouldn’t exist if he hadn’t (somewhat begrudgingly) agreed to undertake this math education project with me or if he hadn’t pushed me to give group work a proper shot as an instructor. Thanks, mathdad!

Of course, I must pay the dog tax. Here is Laika, demonstrating the importance of lab safety.